
")
Google Chrome is used by the majority of the users throughout the world and often they encounter a strange error on it while browsing sites. The error cannot be seen in any other browser such as Internet Explorer or Safari, etc.
Why you get this “DNS PROBE FINISHED NXDOMAIN” error and what you can do to fix it are the questions of the day. That’s what I am going to discuss with you my experience that how I got this error and what methods I applied to troubleshoot it. Let’s come to the point now and see what kind of techniques are available to resolve this problem.
Similar Problem: Your DNS server might be unavailable.
Method #1: Restart the Router
Sometimes, it is due to the router because it does not function properly. When you get this error, you should turn your device off for a couple of minutes and then switch it on. Now try to use Google Chrome.
Method #2: Inactive the firewall of your System
It may be due to the firewall that is blocking the way of Google Chrome to access the sites. Thus, it becomes necessary for you to disable the firewall. To disable the firewall you need to click Here. It is a direct way that could turn the windows defender off so that it may not interrupt Google Chrome.
- Just install it and save it on your desktop. When you open it, it will disable Windows Defender by using Registry Editor method.
- When the software turns Windows Defender off, you will get a notification to confirm it.
Method #3: Restart the DNS Client
If you restart the DNS Client, it will resolve the issue for sure. To do so you need to follow the steps below.
- Press “Windows + R” keys to open Run box. Type “services.msc” in the box and press “Enter” to show the Services.
- When you see the Services page, you need to keep scrolling down until you see the option “DNS Client” that should be in alphabetical order.
- Once you get it, you should right-click on it to show its options. Here you should select “Restart” option.
That’s all guys! Now wait for a while and again try to use Google Chrome that will work this time for sure.
Method #4: Change the DNS Server Address
Related DNS Issue: Fix DNS Server not Responding Error.
If the issue still persists, it may be resolved by changing the DNS Server Address. It may be not working due to the unresponsive DNS Server. So, let’s make an another effort that would be fruitful hopefully.
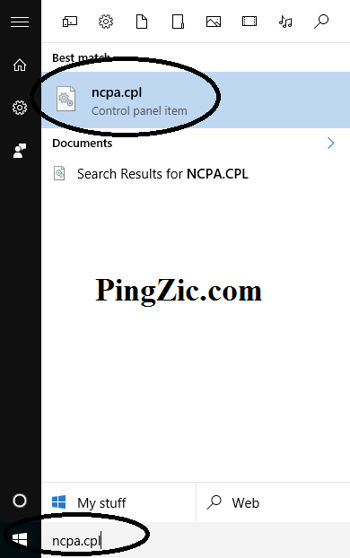
- Press “Windows” key to open Search box. Type here “ncpa.cpl” to go to the Network Connections directly.
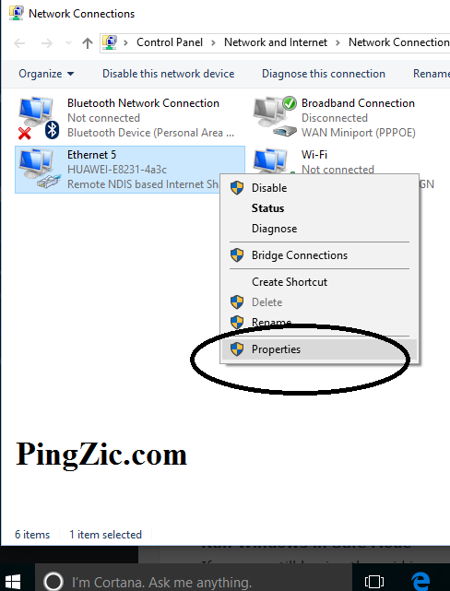
- Right-click the active network connection and select the option “Properties” from the list.
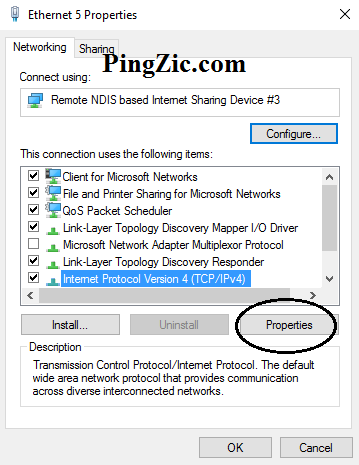
- Here, select the option “TCP/IPv4” and click “Properties to view them.
- Now check the option “Use the Following DNS Server Addresses” and type in the first box “8.8.8.8” before “Preferred DNS Server option. In the second box before “Alternate DNS Server” you need to type “8.8.4.4” Now click “OK” to save your preferences.
Reboot your system to update the modifications to the system. It will fix the error.
Method #5: Flush DNS Cache
If none of the solutions, furnished above is working, the ultimate technique you can apply is to flush DNS cache. For this purpose you have to use Command Prompt. Here is how you can do so.
- You should press “Windows + R” keys to open Run dialogue box. Type here “cmd.exe” and press “Enter.”
- It will open Command Prompt where you need to type “flushdns” command and press “Enter.” This command will erase the details that have been saved in Google Chrome.
Now reboot the computer and enjoy an error-free browsing on Google Chrome.
