

Compressing files can be very beneficial as they take less storage space on the hard disk, and you can also share them with others or even transfer to other computers quite easily. You don’t need the support of any third party tools or software; rather this option is native in Windows 10.
Previously we shared a guide to delete junk Windows installation files, you can also use this method to free up space instead of compressing every file. In this guide, we’ll be going through a step-by-step procedure through which you can Compress or ZIP any file(s).
I’ve explained each step in detail along with relevant images. Though it is not a rocket science, but worth adding to your knowledge.
On your desktop or in the file explorer, take a random file to compress. We are doing this for learning purpose so it can be any file. You can compress the actual file later.
Below I’m on the Windows desktop.
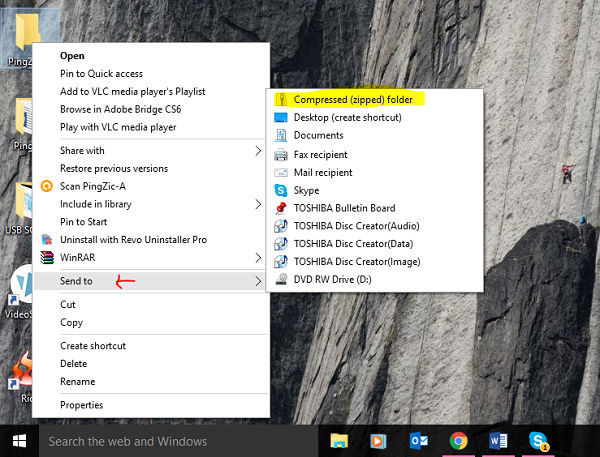
Here I am compressing the “PingZic-A” folder.
- The first thing to do is place your mouse cursor on the file icon and then right-click on it.
- After that, you have to reach the “Send To” menu option, and a new dialog box will open. Here you have to click on “Compressed Zip Folder”. This will create the compressed or zipped file of the relevant folder.
The new compressed file created will have a smaller size as compared to the original file. By default, your system creates the zipped folder with exactly the source file. However, you can rename it by right clicking on the compressed folder and then rename option.
Compressing Files in Bulk
Let’s take this to the next level. Now we’ll compress two or more files at a time. The procedure is exactly the same as we did above. However, here you have to select the relevant files at a time which you wish to compress.
You can do this by holding the “CTRL” button and then clicking with your mouse on all the required files to be compressed.
Here I have taken two files, but you may select more, even a hundred files at a time. After the selection Right Click>Send To>Compressed Zip Folder.
Use 7-Zip
7-Zip is a software utility which you can download from HERE. Make sure that you consider the type of operating system you have, for example, 32-Bit, 64-Bit etc. Once downloaded, install and run the software. After that follow the below steps to compress a file with 7-Zip in windows 10.
1) Click on “Add” button, and navigate the desired file which you want to compress.
2) Next you have to select the format of your file. Don’t forget to set it to “Zip”.
3) Click next and your compress file is ready. You can locate it in the same folder in which the source file exists.

