

The most annoying and irritating problem the users of PC face is when they are installing Windows updates and it shows as if it is stuck. Usually, Windows’ built-in feature known as Windows Update checks for and installs the updates regularly to keep your system faster and error-free.
What’s the Main Problem?
Some users of Windows 7 (as the problem generally occurs in Windows 7) complain that whenever they start Windows Update feature, it starts normally and then for hours it does not show any proceeding and even they cannot see new updates. It indicates that the program is still running, but there is no progress, and no update is installed further.
When it happens time and again, the overall performance of your PC is also affected. If you face this problem and open Task Manager, you will see the “svchost.exe” occupies a large part of memory and CPU resources. Usually, the error occurs when you have installed Windows 7.
Reason Behind This Problem
The actual reason behind it may be a bit trivial for the users of Windows 7 that a few updates by Microsoft upgrade “Windows Update” feature for its better and smooth performance.
Now it seems that the old way of downloading and installing updates is quite changed and thus, the users of Windows 7 face this problem because they are not using the latest Windows Update client.
How to Fix this Problem
Here are a few tips to fix this issue. Exactly, I don’t know which one will work for you the best, but I am pretty sure that if you apply all these one followed by the other, you will get rid of the problem.
Ctrl+Alt+Del (Reboot The System)
This combination of the keys can be very useful if you realize that your Windows Update service client is really stuck. Follow the instructions below to use the combination of these keys.
- If the tool is stuck, just press “Ctrl+Alt+Del” to restart the system.
- If it does not restart automatically even by using this combination, you need to press “Power” button for a shutdown and then after a few seconds, press the “Power” button again to boot the system.
- Now you will see the system will start installing updates first and later you will see the desktop window.
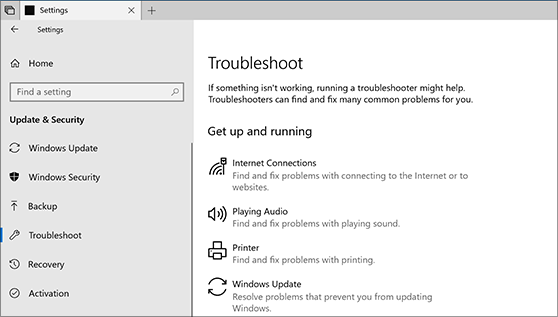
Use Troubleshooter
You can use troubleshooter for this purpose. It is a built-in feature of Windows 7 that can help you fix this issue. It is a quick way to get rid of the problem.
Follow the steps below to run Troubleshooter.
- Go to the “Start” button and type “Troubleshooter” in the search bar. You will see it in the Search list. Just click to open it.
- In the Control Panel, you will see the section “System and Security” where you need to select the option “Fix problems with Windows Update.”
- It will take you to the Windows Update window where you need to click “Advanced” option as shown in the figure below.
- As soon as the Advanced option expands, you will see an option “Apply repairs automatically” with a check box. Make sure it is enabled. Above this option there lies “Run as Administrator” feature that needs to be selected.
Now the troubleshooter will start working, and it will work in three ways to fix this issue.
- It will close the Windows Update tool.
- It modifies the name of the tree \Windows\SoftwareDistribution into \Windows\SoftwareDistribution.old and clears the downloading cache of Windows Update. So, you would be able to start it again.
- Once you use it, Windows Update tool will restart to fetch updates.
That’s all. Now use Windows Update again, and it will start installing updates without being stuck.
If the issue persists, you need to move to the techniques given below.
Clear Cache Memory Manually
Another way to get rid of this problem is to delete the cache memory of Windows Update.
- You need to restart your system into Safe Mode first.
- Now open “Command Prompt” by using the “Windows Key + X” combination to access Command Prompt (Admin). Or you can go to “Start” and type “Command Prompt” in the search bar. Once you get it, just right-click and select “Run as Administrator” option from the context menu.
- As soon as the “Command Prompt Admin” window appears, you need to type “net stop wuauserv” command and press Enter. It will show you that Windows Update service has stopped working.
- Now click on the “File Explorer” that lies next to the Start button. It will show you Local Disk (C:) in the left pane. Click to view its menu.
- Now click “Windows” folder that lies at the bottom of the folders list.
- It will navigate you towards the content of Windows folder. The list of sub-folders goes alphabetically. So just scroll down to look for “SoftwareDistribution” folder. Once you get it, just click to proceed.
- Now you will see some folders in it. You need to select all of them. None of them is necessary. Now right-click to view the option “Delete” and select it to remove cache.
- Now come to the Command Prompt Admin once again. Type here “net start wuauserv” command and press “Enter” key. Windows Update will start working again.
- Now restart the system (normal boot) and you see! Windows Update service is working efficiently this time.
Install the Required Software
You need to install the required software in your Windows so that it may boost up the system for searching and installing the desired updates. If you are using Windows 7 (32-bit), you need to download THIS SOFTWARE BY MICROSOFT.
If you are using Windows 7 (64-bit), you need to download THIS SOFTWARE BY MICROSOFT.
Once you have done with it, just reboot the system and then restart Windows Update service. This time, it will work promptly.
Install Security Update
One of my fast friends has tried this method, and he found it quite useful that’s why I am discussing here. It can also be handy for you. You need to download the security update that is known as “win32k.sys.” and you can install it to avoid the problem. You need to install KB3161664.
Just install and then restart the system. Now your Windows Update feature will be working without any issue.
WSUSOffline
If none of the above-discussed methods is working, you need to use WSUSOffline.
Once you use it, you would be able to install all of the updates.
For the Users of Windows 8
Run the Scan
When you are using Windows Update Service, and you see it is stuck, you need to give it another chance. Reboot the system and run it again. It will be effective.
Refresh Your System
If you use this feature in Windows 8, the recent features will be restored to the original version of the Windows. It is quite handy if you need to re-install the necessary updates that are not recently added to your system. Moreover, when you use this option all of the apps or programs you have installed from online sites or disc, will be deleted automatically. You need to follow the instructions below to refresh the system.
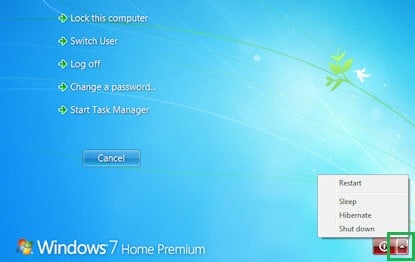
- Turn off the system by using the “Power” button.
- Wait for a while and press the “Power” button to start the system.
- You will see the “Power” icon at the bottom on right side of the screen when the Logon screen appears.
- Click this option. Now press the “Shift” key and select “Restart” option.
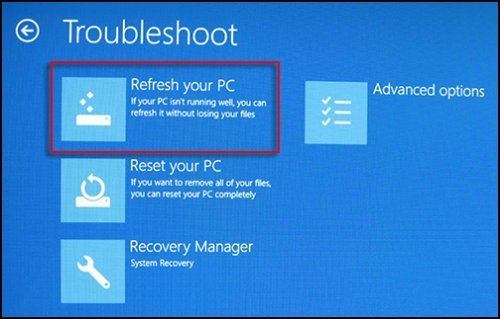
- It will show you a page “Choose an Option” where you need to look for “Troubleshoot.”
- From here, you need to select “Advanced Options” to move ahead.
- You will see the tool “Refresh your PC” that needs to be selected. Once you select it, you will see “Next.” Just click on it and follow the directions appear before you.
That’s it. Now it will work finely.
